laravelやdjango使ってますが、簡単なサイトならFastAPI(+react, vue, etc)のほうが動作も早いし開発も簡単そうなので、FastAPIはじめてみました。

目次
インストール
$ python -m venv venv
$ source venv/bin/activate
(venv)$ pip install fastapi uvicorn[standard] gunicorn
(venv)$ pip freeze > requirements.txt
本番環境ではgunicornがおすすめらしいので、予めインストールしておきます。

main.py作成
from fastapi import FastAPI

app = FastAPI()


@app.get("/")
def read_root():
    return {"Hello": "World"}


@app.get("/items/{item_id}")
def read_item(item_id: int, q: str = None):
    return {"item_id": item_id, "q": q}
まずは、そのままコピペ。
uvicorn起動
$ uvicorn main:app --reloadhttp://127.0.0.1:8000にアクセスすると、JSONが返ってきます。
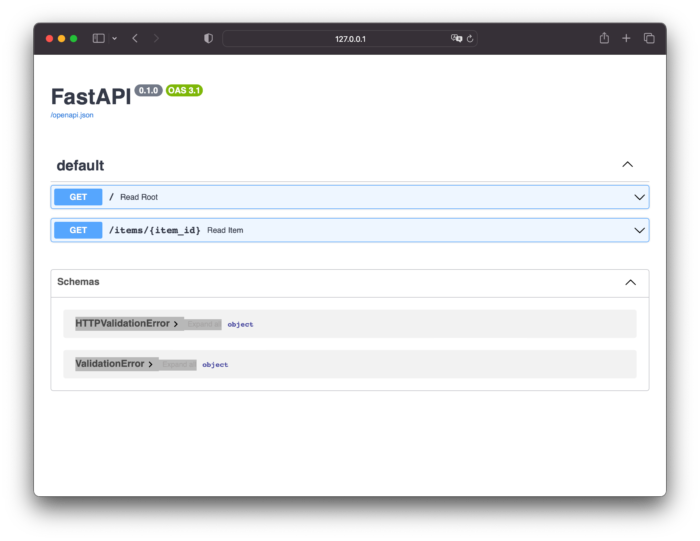
{"Hello":"World"}が、http://127.0.0.1:8000/docsにアクセスすると、APIドキュメント(Swagger UI)が表示されます。
サーバー(ubuntu, nginx, gunicorn)にデプロイ
作成したファイル(今回は、main.pyとrequirements.txt)をサーバーにアップ(ここでは、/home/ubuntu/fastapi/にアップしたとします。)して、必要なものをインストール。
$ python -m venv venv
$ source venv/bin/activate
(venv)$ pip install -r requirements.txt
gunicornの設定ファイルを作る
どこにつくってもよいのだが、とりあえず同じディレクトリに作ります。
from multiprocessing import cpu_count

chdir = '/home/ubuntu/fastapi'

# Socket Path
bind = 'unix:/home/ubuntu/fastapi/gunicorn_fastapi.sock'

# Worker Options
workers = cpu_count() + 1
worker_class = 'uvicorn.workers.UvicornWorker'

# Logging Options
loglevel = 'debug'
accesslog = '/home/ubuntu/fastapi/fastapi_access_log'
errorlog = '/home/ubuntu/fastapi/fastapi_error_log'
daemonを起動するためのファイルを作成
$ sudo vim /etc/systemd/system/fastapi_gunicorn.service[Unit]
Description=Gunicorn Daemon for FastAPI Test Application
After=network.target
[Service]
User=ubuntu
Group=www-data
WorkingDirectory=/home/ubuntu/fastapi
ExecStart=/home/ubuntu/fastapi/venv/bin/gunicorn -c /home/ubuntu/fastapi/gunicorn_conf.py main:app
[Install]
WantedBy=multi-user.targetsystemctlで起動
$ sudo systemctl start fastapi_gunicorn
$ sudo systemctl status fastapi_gunicornActiveの欄がactive(runnning)になっていればOK。自動起動も登録しておきます。
$ sudo systemctl enable fastapi_gunicornnginxの設定
$ sudo vim /etc/nginx/conf.d/fastapi.confserver {
server_name fastapi.b13.app;
root /home/ubuntu/fastapi;
location / {
proxy_pass http://unix:/home/ubuntu/fastapi/gunicorn_fastapi.sock;
}
}$ sudo nginx -s reloadLet’s Encriptの更新
appドメインはssl必須なので、更新しないとアクセスできません。ただ、一行コマンド打つだけ。簡単。あらかじめ、サブドメインとIPアドレスの設定はDNSサーバーでしておく必要はあります。
sudo certbot --nginx